Measuring Angularity
When the angle between the specified lines or planes is not 90°, you measure the angularity, which specifies the accuracy of the angle to the datum (reference plane or line).
The unit of angularity measurement is not the angle (degree), but the millimeter.
Sample Drawings

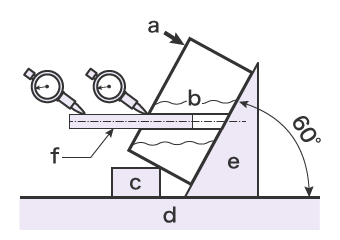
Using a Dial Gauge

- a
- Hold
- b
- Target
- c
- Support
- d
- Surface plate
- e
- Angle plate
- f
- Mandrel
Using a commercially available angle plate and support, fix the target on the datum plane at an accurate angle.
Using a mandrel or pin gauge makes for easier measurement.
If the angle is as per specified in the drawing, the placed mandrel (or pin gauge) will be level. In that state, measure the parallelism of the mandrel to the surface plate using a dial gauge.
The angularity is the difference between the maximum and minimum values of the dial gauge run-out.
DISADVANTAGES
Setting up the mandrel so that it is parallel to the surface plate, and setting up the target, angle plate, and other tools take time.
When measuring a plane for angularity, due to the larger number of measurement points, the measured values are error-prone.
Targets that cannot be properly fixed to the angle plate are difficult to measure.
Using a Coordinate Measuring Machine (CMM)

- a
- Target
- b
- Coordinate measuring machine plate
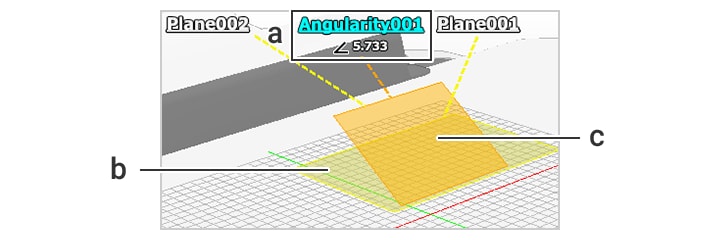
Set the datum by putting the stylus on multiple points on the datum plane, and measure the angularity by putting the stylus on the target’s measurement plane.
Measurements can be taken similarly for cases where there is a datum system, such as a 2D planar system datum or 3D planar system datum.
This can shorten the time required for setting up the target, as well as ensure accurate measurement even with targets that cannot be fixed to the plate.
- Measurement screen
-

- a
- Angularity measurement result
- b
- Datum plane
- c
- Datum plane


