Measuring the Profile Tolerance of Plane
When measuring the profile tolerance of a plane, you are checking whether a designed part’s curved surface is made to the specified design.
Unlike the profile tolerance of a line, the measurement of the profile tolerance of a plane involves the entire specified curvature.
Sample Drawings

Using a Profile Measurement System

- a
- Target
- b
- Profile measurement system
Put the stylus on the measuring starting point of the target and specify the measurement length to measure.
The system performs analysis using the measured data and the theoretically correct data registered in the system, and outputs the P/V value (the maximum and minimum values, as well as the standard deviation σ from the theoretically correct feature).
DISADVANTAGES
Due to the limited movable range of the stylus, measuring large targets can be difficult.
The stylus also cannot enter measurement points located in a difficult-to-reach position.
Deformation can occur to the measurement surface by the load (measuring pressure) of the stylus, which can cause an error in the measurement result.
Using a Coordinate Measuring Machine (CMM)

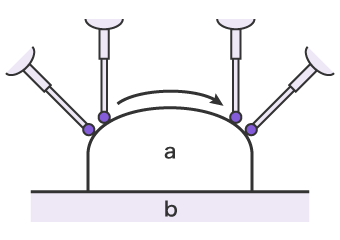
- a
- Target
- b
- Surface plate
The stylus position can be changed to measure the target at any angle or in any location.
As the stylus only comes into light contact with the measurement point, there is no concern of deformation on the measurement surface caused by the load (measuring pressure) of the stylus.
Additionally, this enables quick, stable measurement with high accuracy.
- Measurement screen
-

- a
- Profile tolerance measurement result


