Measuring Symmetry
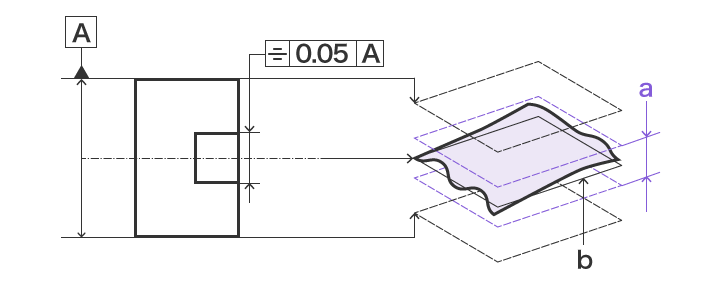
When measuring symmetry, you are checking how accurately symmetrical the target is against the datum (reference plane).
Sample Drawings

- a
- Within 0.05 mm from the theoretical center plane
- b
- Theoretical center plane
Using a Caliper or Micrometer

Measure parts of the target using an analog caliper or micrometer to check the symmetry.
It is useful for repeated measurements of single items thanks to its simple, quick usability.
Both calipers and micrometers come in various types, which are selectively used depending on the location and form to be measured.
DISADVANTAGES
The accuracy of measured values and speed of measurement rely on the skill level of the operator in addition to the measurement error of the individual instrument. Furthermore, while size can be measured as these instruments measure the length between two points, geometric tolerance (form) is difficult to measure.
Additionally, the measurement data needs to be handwritten for recordkeeping.
Using a Coordinate Measuring Machine (CMM)

- a
- Stage
- b
- Surface plate
The reference element (plane) set-up and the deviation from the target element (plane) can be quickly and accurately measured by anyone just by putting the stylus on each measurement point.
The measurement result is recorded in the measuring machine.
- Measurement screen
-

- a
- Reference element (plane)
- b
- Symmetry measurement result
- c
- Target element 1 (plane)
- d
- Target element 2 (plane)


