Vision Systems
- Vision System with Built-in AI VS series
- Intuitive Vision System CV-X series
- Customizable Vision System XG-X series
- GigE camera and lighting for PC-based machine vision VJ series
- Inline 3D Inspection 3D Vision series
- 3D Vision-Guided Robotics 3D VGR series
- Line Scan Technology Line Scan series
- 2D Vision-Guided Robotics 2D VGR series
- LED Lighting CA-D series
- Lenses (for Machine Vision) CA-L series
- Machine Vision System Database VisionDatabase series
- Automotive
- Automation Equipment/Machine Building
- Electric Vehicles
- Medical Device Manufacturing
- Food/Beverage Packaging
- Semiconductor/Manufacturing Electronics
- Vision-Guided Robotics
- Solar
- Logistics
- Commodities
- Paper Manufacturing
- Machine Tools
- Electronic Device
- Printing
- Mining/Metals
- Fabric/Textile
- Tobacco
- Marine
- Aerospace
3D Inspection Software (Volume, Height)
Explore the capabilities of 3D inspection software, gaining insights not only into surface details but also height, area, and volume. Learn more with our guide.
3D Inspection (Volume, Height)
For appearance / dimension inspection and positioning using image processing and character recognition using OCR, targets are detected or differentiated based on the shade data of their surfaces. To increase the accuracy of these operations, various measures have been introduced, including the use of high-pixel machine vision, optimization of lenses and lights, and adoption of image enhancement filters and other technologies. Even with the latest technologies, it is still hard to solve certain problems in image inspection, including:
- Differentiating flaws or distortions from discoloration or color irregularity
- Detecting the depth of flaws or distortion level
- Performing pass/fail judgment based on capacity or volume
- Inspecting the profile of solder or welding
These targets are hard to detect from 2D images, so judgment depends on the human eye. Inspection using 3D images can solve these problems. 3D inspection software plays a crucial role in various industries, such as food and beverages, manufacturing, and engineering. This powerful software allows for quick and accurate measurement of objects and structures in three dimensions. This page explains 3D inspection, which detects height and surface information.
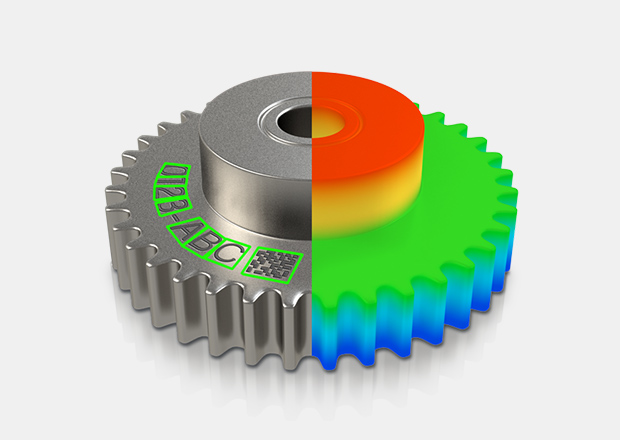
Simultaneous 2D + 3D inspection
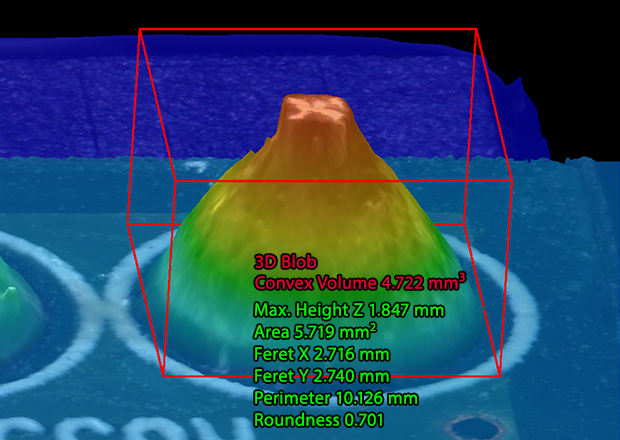
Capable of inspection using actual height and volume
We’re here to provide you with more details.
Reach out today!

Basic Principle of 3D Inspection Which Uses 3D Images to Achieve Inspection That Is Impossible With 2D Images
Advantages of 3D Inspection
2D inspection detects or differentiates appearance or dimension based on shade data. 3D inspection uses height information (XYZ coordinates) as well. This section describes the differences between 2D and 3D images and the advantages of introducing 3D inspection.
- Differences between 2D and 3D images
- 2D Images:
- 2D images are captured from one direction. They can be used to find defects on the surface of parts/products through shade adjustment with image-enhance filters.
- 3D Images:
- Adding height information to a 2D image makes a 3D image. Including the XYZ coordinate information makes it possible to obtain information about not just height, but also volume and sectional area.
Curious about our pricing?
Click here to find out more.

Comparing 3D Dimensional Inspection With 2D and Manual Inspections
Manual inspections are mostly provided by human operators, whose methods are often susceptible to error. These methods severely lack accuracy and precision when compared with 3D dimensional inspection.
The biggest advantage 3D vision systems have over 2D inspections lies in the third dimension. While 2D measures length and width, 3D systems benefit significantly from being able to measure height. This, of course, includes volume, which is derivative of all three dimensions. This is achievable through the use of manual tools, but not as efficiently and accurately as with a 3D machine vision system.
3D machine vision systems, paired with 3D inspection software, excel at object analysis at high speeds, which significantly reduces inspection times compared to manual methods. The increased efficiency is crucial in high-volume production environments, where time savings equal cost savings.
This precision and high efficiency offer consistent and repeatable results, especially when compared to manual inspection methods, which are subjective and vary between operators. This is vital for maintaining quality standards.
Lastly, 3D machine vision systems and 3D inspection software are capable of identifying defects early in the production process, and a 3D inspection system allows for immediate correction, which further reduces waste and eliminates the need for rework.
3D machine vision systems are crucial for the development of Industry 4.0, as they offer exceptionally high accuracy, efficiency, and consistency in measuring volume and height across a range of industries.
Effects of Introducing 3D Inspection: Stable Inspection
2D inspections often suffer from unstable detection of flaws or dents depending on the color or pattern of the target, and effects of the environment such as reflections from glossy surfaces or lights. It is hard to increase the accuracy even with image-enhance filters such as shading correction, blob processing, and contrast conversion. The 3D inspection makes it possible to perform stable detection of minute dents and flaws that look similar to patterns on the target, which are difficult to differentiate from conventional 2D images. This allows automation of inspection.
3D inspection allows inspections using volume or sectional area information, based on height differentiation or XYZ information. This greatly expands the range of inspections possible with image processing.
Coplanarity inspection of electronic components
2D inspection
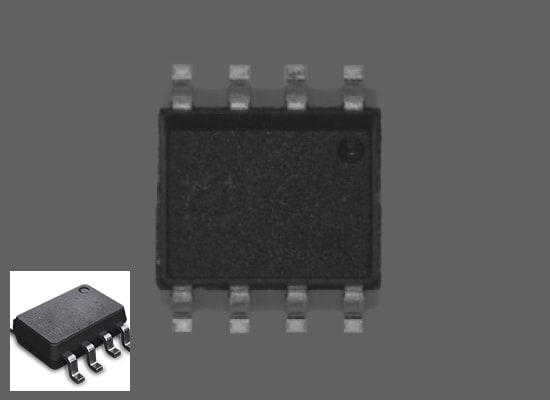
It was impossible to use height information for detection.
Solution with 3D inspection
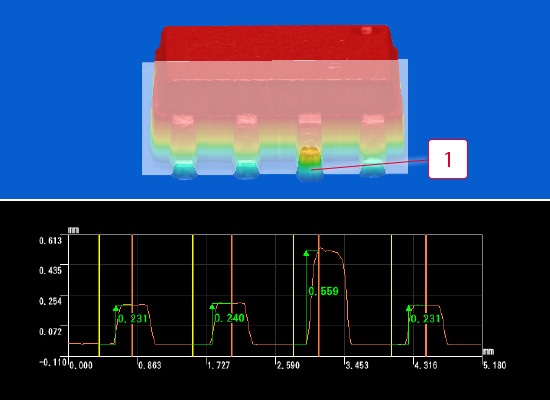
Quantifying height information
Visualizing the heights of terminals allows judgment based on height.
-
1Loose terminal
Inspection of solder fillet
2D inspection
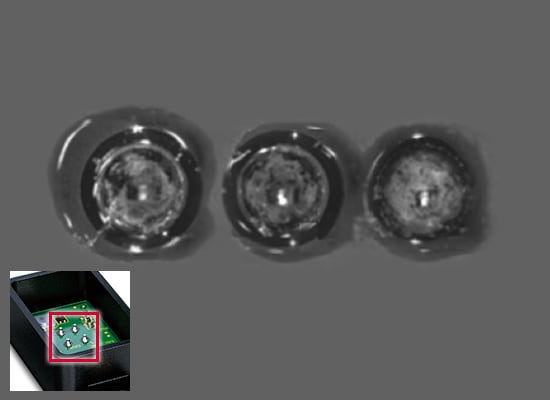
Inspection was not stable when only shade information was used.
Solution with 3D inspection
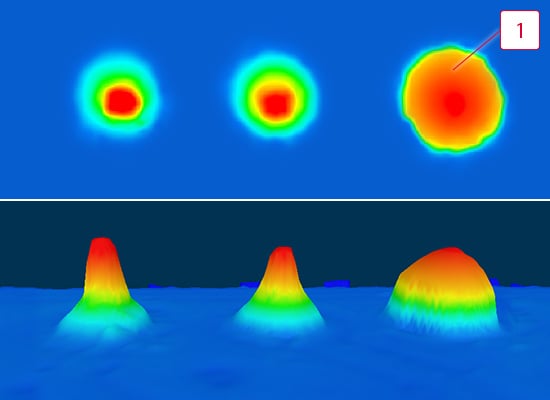
Checking X, Y, and Z with one unit
Adding height (Z) information to XY information enables inspection using volume or sectional area.
-
1Excessive solder
Profile inspection of paste application
2D inspection
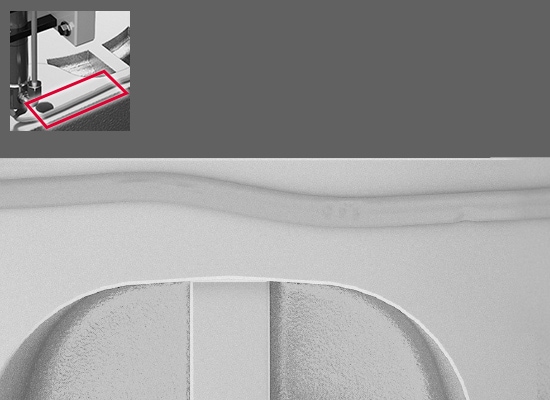
Inspection was sometimes unstable depending on the background color.
Solution with 3D inspection
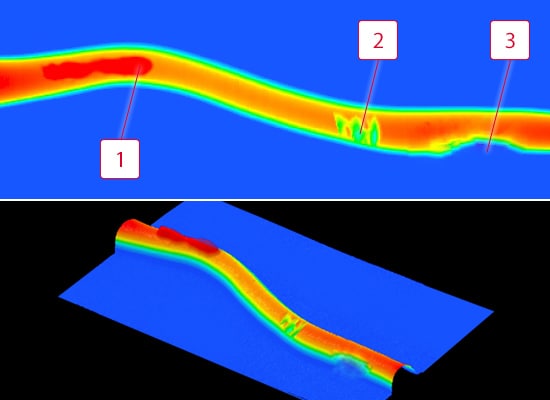
Not affected by contrast
Unlike conventional detection based on contrast differences in shade information, changes in profiles can be detected easily.
-
1Excessive
-
2Insufficient
-
3Narrow
Effects of 3D Inspection Using Image Processing: Improved Efficiency
With a 3D measurement system, anyone can conduct a 3D inspection. Unfortunately, 3D measurement systems are designed for offline inspection, and it takes a lot of time to bring targets to the measurement room and measure them. This is acceptable as long as the target is a high-value-added product manufactured in low volume. However, it is impractical to conduct 100% inspection for products produced in large lots of thousands or tens of thousands per day.
With machine vision/image processing systems, you can obtain 3D information inline, resulting in efficient inspection. The latest image processing systems offer processing speed fast enough for applications on high-speed lines. This allows 100% inspection without affecting takt time. This prevents the outflow of defective workpieces, helping to improve quality.
Effects of Introducing 3D Inspection: Equipment/Labor Cost Reduction
You can automate the inspections that rely on visual or offline inspection, which reduces labor costs. A 3D camera can capture both 3D and 2D images (gray-scale images) simultaneously, reducing equipment costs.
The Measurement Principle of 3D Inspection
KEYENCE offers two types of measurement systems for 3D inspection. The XT 3D camera is suitable for stopped targets and pitch-feeding lines; the LJ Series high-speed 2D/3D laser scanner is suitable for moving targets and continuous feeding processes. Each has its own characteristic measurement principles and functions to achieve optimum 3D inspection depending on the application and target conditions.
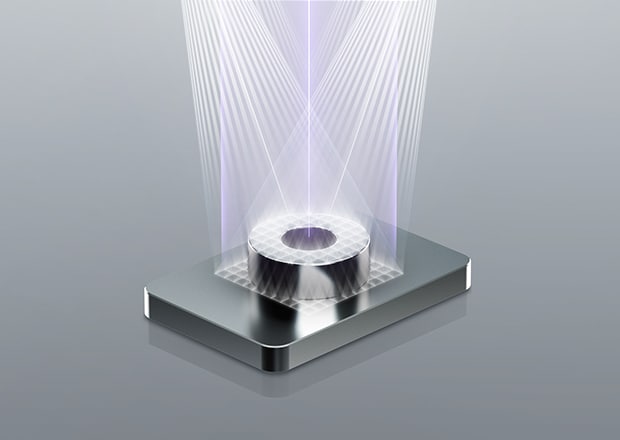
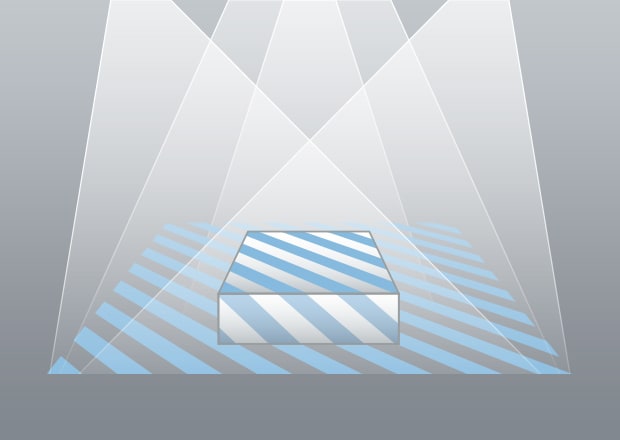
Pattern projection
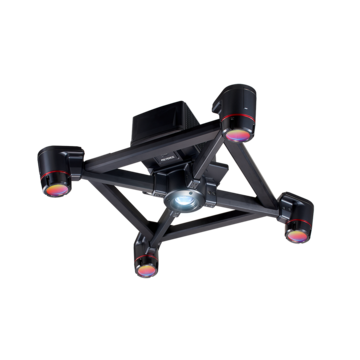
The XT uses the pattern projection method. It projects stripe patterns from the right and left at high speed and analyzes the reflected light with an ultra-high-speed CMOS and a special processor to generate a 3D image. Projecting patterns from four directions to synthesize profile information allows the capture of images without blind spots. The XT can also work as an area camera to capture 2D (black and white shade) images. The ability to conduct 2D and 3D inspections simultaneously is another advantage.
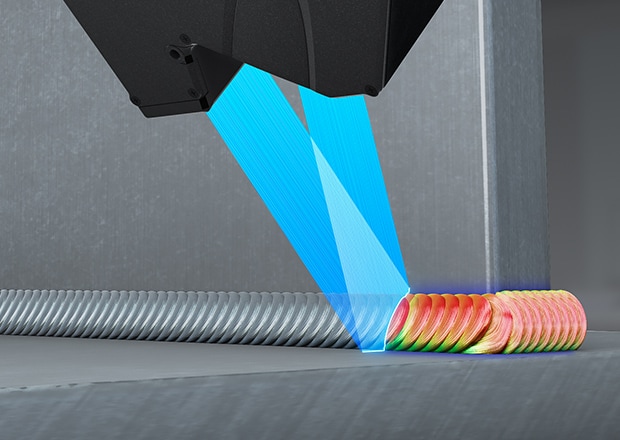
LJ Series for measurement of large areas
The measurement range of the XT is limited, from 24.1 mm square to 40 mm square. Consequently, it is suitable for 3D inspection of relatively small parts and products such as electronic devices. If you want to conduct a 3D inspection of larger areas, the LJ Series inline 2D/3D laser scanner is ideal. You can perform 3D inspection, including height, area, and volume information, by capturing high-accuracy 2D profile data through the light-section method and processing it with an image processing system such as the XG-X Series. This allows 3D inspection of lengthy targets such as weld beads or of fast-moving targets.
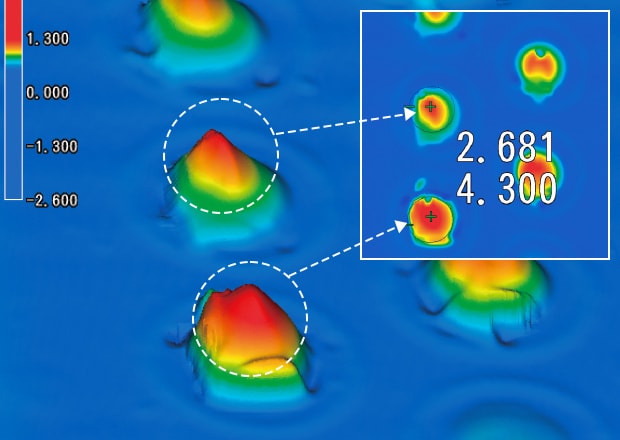
Algorithms and various software that support 3D image inspection
Various image processing technologies play a part in 3D inspection. With the XG-X Series customizable machine vision, just specifying an inspection area in a captured 3D image allows measurement of minimum height, maximum height, convex area, concave area, convex volume, and concave volume. First, specify a zero plane as a reference for height measurement. Then, measure the area or volume of a convex/concave area concerning the zero plane.
Before correction
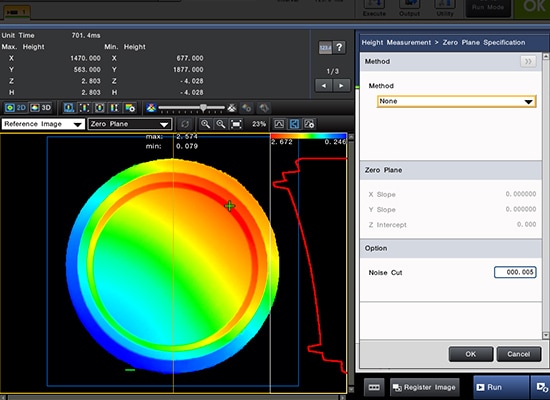
After correction
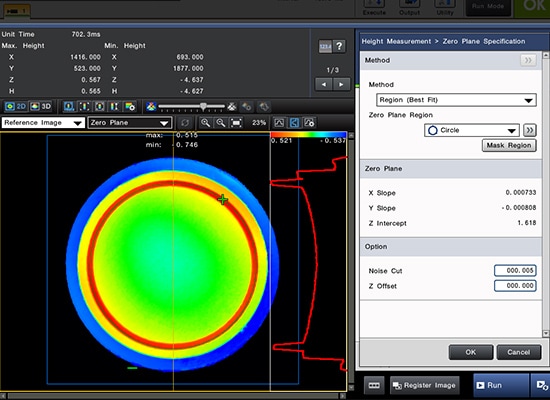
Various other useful functions greatly improve inspection accuracy and streamline the work of setting up the system.
About the XG-X Series customizable machine vision
Practical Applications
Many inspections that are impossible with 2D images are possible with 3D images. Let's look at some typical applications.
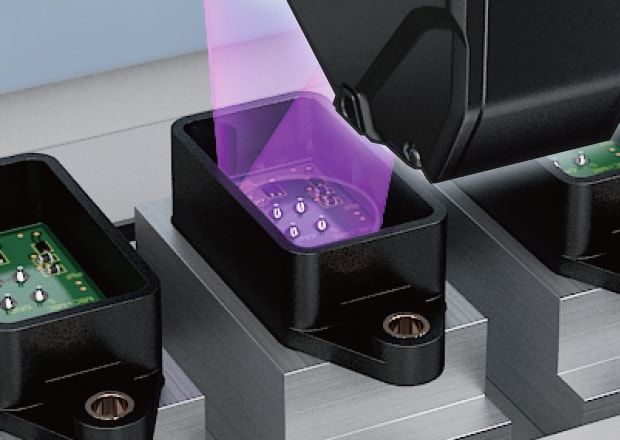
Inspection of solder fillet shape
Inspection of solder fillet
It is difficult to detect the condition of solder surfaces through surface inspection with machine vision. Electronic devices have become miniaturized and more accurate in recent years. It is difficult to make judgments visually or using machine vision. The introduction of 3D inspection makes not only height but also area and volume information available. This allows reliable inspection of solder fillet shape.
Conventional camera
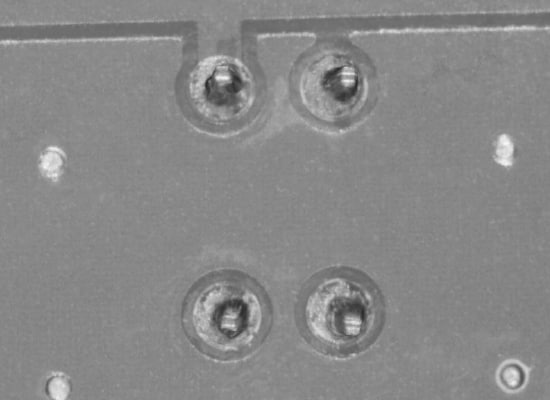
Inspection was unstable due to the influence of the solder surface conditions.
XT
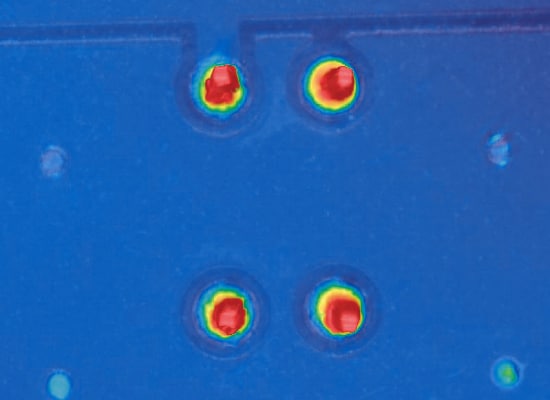
3D inspection enables inspection of height and shape without being affected by surface conditions.
Inspection point
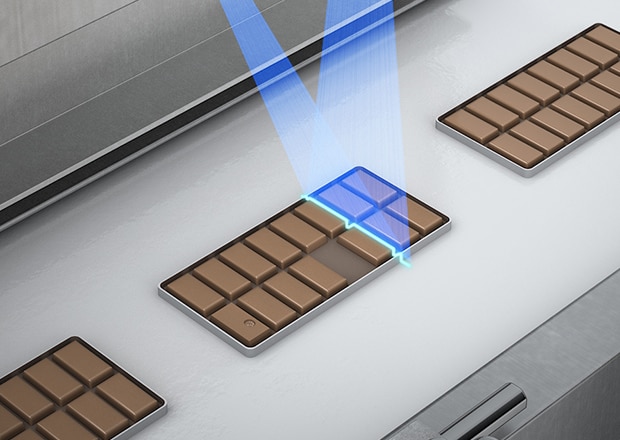
Counting chocolate pieces and checking for missing pieces
3D inspection has also been introduced in the food and pharmaceutical industries. When targets do not show shade differences, like chocolate, it is hard to detect flaws or dents with conventional 2D inspection. With 3D inspection, flaws and dents can be detected reliably from height and other information. Counting is also possible, which helps improve production efficiency.
Connecting the LJ Series 3D measurement system allows the counting of targets while also checking for dents and foreign particles on the target surfaces.
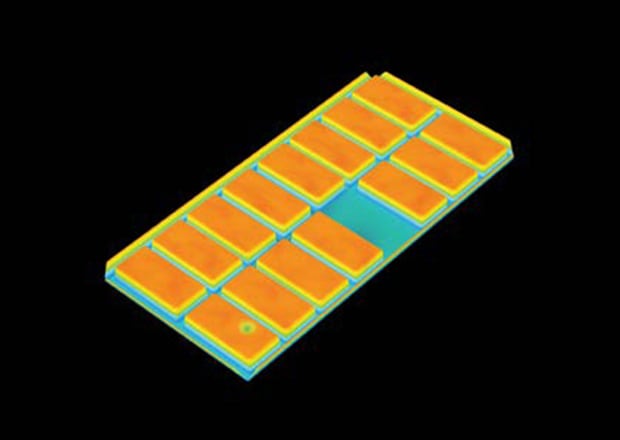
3D image
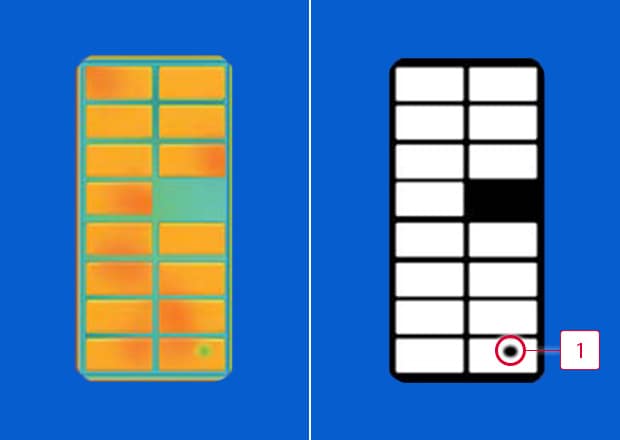
Processed image
-
1Insufficient
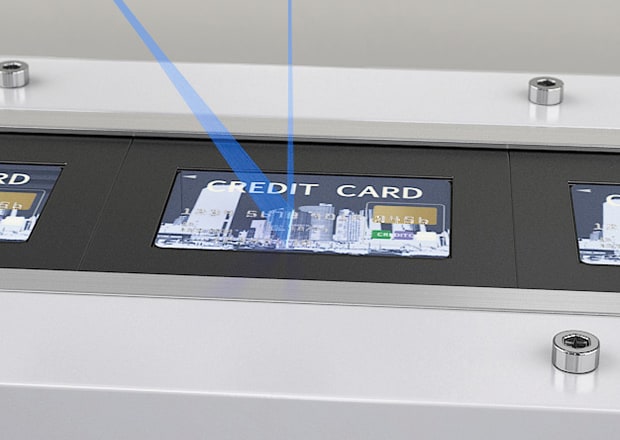
OCR reading of card numbers
OCR reading of card numbers
When a card has a background picture or illustration, as is often found on credit cards, detection of the card number is difficult due to the influence of the background. Since 3D inspection can recognize height, it can read the card number, expiration date and name embossed on the card surface accurately using OCR.
Conventional camera

Reading was impossible due to the influence of the background.
LJ Series
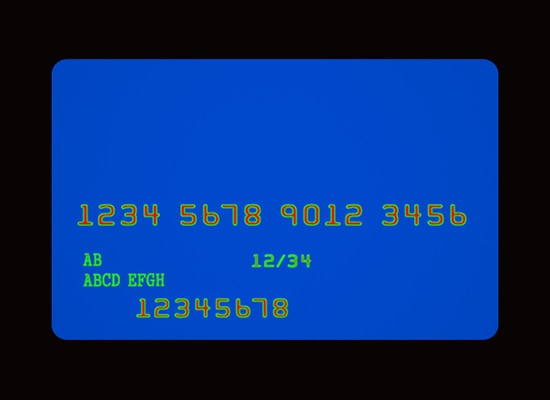
The measurement using height information ensures stable OCR.
Discover more about this product.
Click here to book your demo.

Industry-Specific Applications of 3D Vision Inspection Systems
Thanks to the unique advantages 3D vision inspection systems offer, many businesses are now using these systems to enhance their manufacturing efficiency and product quality.
For example, their high accuracy, often measured in the single-digit µm range, makes them very useful in industries where precision is paramount. This includes the automotive industry, where these systems are used to verify and inspect dimensions and volumes of complexly shaped components, like engine parts.
The electronic industry has undergone massive miniaturization of components, leading to densely populated circuit boards almost impossible to inspect accurately by hand. The electronics industry relies on 3D machine vision systems, complemented by 3D inspection software, to measure the height and volume of the solder paste applied during the PCB assembly process.
This ensures proper solder paste application and reduces the risks of cold joints. Additionally, these systems are also used to measure the height and position of soldered components, ensuring they’re positioned correctly.
Industries dealing in perishable goods, such as food, beverage, and cosmetic industries, typically rely on 3D inspection to measure the height and volume of their products. This helps with consistency in packaging and detects any physical deformities that could indicate processing errors or contamination in the manufacturing process.
The same applies to aerospace and defense, which rely on 3D vision and 3D inspection software for the inspection of parts and components that are manufactured within exceptionally tight tolerances. KEYENCE's 3D machine vision technology utilizes pattern projection and laser profilers to perform 3D inspections on continuous processes, stationary parts, and objects close to the sensor.
Interested in improving your production efficiency and accuracy? Look no further than KEYENCE’s cutting-edge 3D vision systems. Contact us to learn more about how our advanced technology can help take your manufacturing processes to the next level.
Contact us to learn more about how our advanced technology can help take your business to the next level.
Contact Us
Related Downloads

This guide is a compilation of trivia pertaining to vision systems. Figures are used to provide easy-to-understand explanations of principles and characteristics for items ranging from lenses, image capturing, lighting, and color to communication and preprocessing. This guide is a must-read for anyone wanting to learn all about vision systems.
Related Products
Industries
- Automotive
- Automation Equipment/Machine Building
- Electric Vehicles
- Medical Device Manufacturing
- Food/Beverage Packaging
- Semiconductor/Manufacturing Electronics
- Vision-Guided Robotics
- Solar
- Logistics
- Commodities
- Paper Manufacturing
- Machine Tools
- Electronic Device
- Printing
- Mining/Metals
- Fabric/Textile
- Tobacco
- Marine
- Aerospace


