Fluorescence Microscopes
How to Minimize Photobleaching in Fluorescence Microscopy: A Comprehensive Guide
Photobleaching is a common challenge in fluorescence microscopy that can significantly affect the quality and reliability of imaging experiments. It occurs when fluorescent molecules (fluorophores) lose their ability to emit light after prolonged exposure to intense illumination. This article explores practical strategies to prevent or minimize photobleaching, enabling you to extend the lifespan of your fluorophores and capture high-quality images.
Photobleaching in Fluorescence Microscopy – What Is It and What Causes It?
If you’ve done any imaging on an epifluorescence microscope or a confocal microscope, then you’ve probably come across this before. The area of the sample that you’re viewing is getting darker over time and requires you to increase the light intensity or camera exposure in order to capture a decently bright image. This darkening of the sample is what is known as photobleaching.
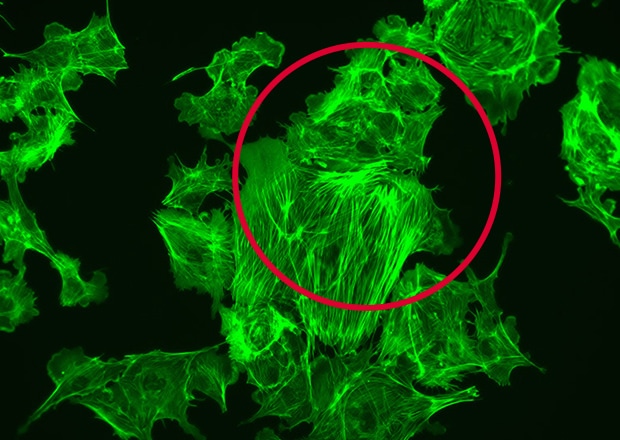
New sample
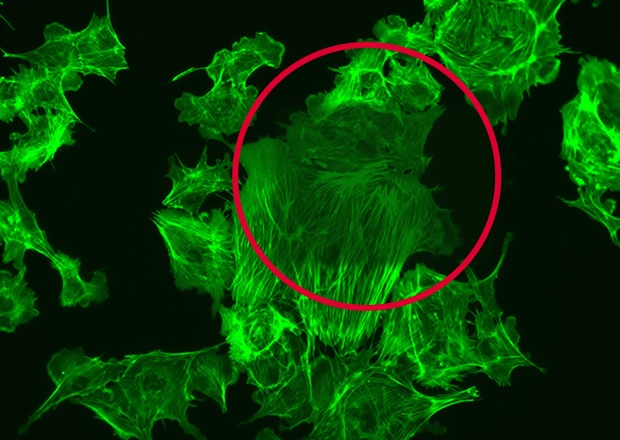
After exposure to high-intensity light
Photobleaching happens due to the irreversible destruction of fluorophores caused by:
- Prolonged exposure to high-intensity light.
- Reactive oxygen species (ROS) generated during the excitation process.
- Environmental factors such as pH changes or oxidative stress in the sample.
Understanding these mechanisms is the first step in mitigating photobleaching.
High-intensity light causes photobleaching through a combination of photophysical and photochemical processes that damage fluorescent molecules (fluorophores), rendering them unable to emit light. Here’s a breakdown of the mechanisms involved:
1. Excitation and Transition to Excited State
Fluorescence occurs when a fluorophore absorbs light (photons) and transitions to an excited electron state.
The fluorophore then relaxes back to its ground state, emitting a photon of lower energy (fluorescence).
2. Generation of Reactive Oxygen Species (ROS)
When exposed to high-intensity light, the energy absorbed by the fluorophore can interact with oxygen molecules in the environment, generating ROS. These ROS are highly reactive and can oxidize the fluorophore, causing irreversible structural damage and loss of fluorescence. Some ROS include:
- Singlet oxygen (1O2).
- Superoxide radicals (O2⋅−).
- Hydrogen peroxide (H2O2).
3. Triplet State Formation
High-intensity light increases the likelihood of fluorophores entering the triplet state, a high-energy but unstable state.
In the triplet state:
- Fluorophores have longer lifetimes, increasing their exposure to interactions with oxygen.
- Interactions between the triplet state and molecular oxygen lead to ROS production and photobleaching.
4. Photochemical Degradation
The energy from high-intensity light can break chemical bonds within the fluorophore, altering its structure.
This degradation may:
- Alter the fluorophore's absorbance/emission properties.
- Prevent the molecule from returning to its original state.
5. Cumulative Damage
Prolonged high-intensity illumination causes repeated excitation cycles, amplifying the chances of:
- ROS generation.
- Irreversible damage to the fluorophore.
- Degradation of the surrounding sample environment (e.g., proteins, lipids).
Contact us to learn more about how our advanced technology can help take your business to the next level.
Contact Us
Factors Influencing Photobleaching in Fluorescence Microscopy
- Light Intensity: Higher intensities accelerate excitation and increase ROS generation. This can be a particular issue when using lasers to illuminate a sample.
- Excitation Wavelength: Shorter wavelengths (higher energy) are more likely to cause photodamage.
- Environmental Conditions: Oxygen levels, pH, and buffer composition influence the stability of fluorophores.
- Photostability of Fluorophores: Less stable dyes (e.g., FITC) bleach faster under high-intensity light.
Why Does High Intensity Matter?
At high light intensities:
- The rate of excitation outpaces the natural relaxation and recovery processes of the fluorophore.
- Photobleaching is not only faster but also more severe, leading to quicker signal loss and reduced imaging quality.
Understanding these mechanisms emphasizes the need for careful control of light intensity during fluorescence microscopy to preserve fluorophore performance and maintain reliable results.
We’re here to provide you with more details.
Reach out today!

10 Tips to Minimize Photobleaching
1. Use Antifade Reagents
Antifade reagents, like DABCO, ProLong Gold, or VECTASHIELD, are chemical compounds designed to neutralize ROS and protect fluorophores. Choose a reagent compatible with your sample and imaging conditions.
2. Optimize Illumination Intensity
- Use the lowest light intensity that still provides sufficient signal-to-noise ratio (SNR).
- Adjust your microscope’s laser or lamp settings to avoid overexposing your sample.
3. Reduce Exposure Time
- Shorten the duration of light exposure by optimizing imaging settings like frame rates and acquisition times.
- Use time-lapse imaging strategically to capture only essential time points.
4. Use Neutral Density Filters
Neutral density filters reduce the intensity of illumination without altering the wavelength. This simple adjustment minimizes photobleaching while maintaining image quality.
5. Choose Stable Fluorophores
- Select fluorophores with high photostability, such as Alexa Fluor dyes or quantum dots.
- Avoid less stable dyes like FITC or Cy3 for long-term imaging.
6. Utilize Multiphoton Excitation
Multiphoton microscopy uses longer wavelengths and restricts excitation to the focal plane, reducing out-of-focus photobleaching. This technique is ideal for imaging thick or sensitive samples.
7. Employ Advanced Imaging Techniques
- Light-Sheet Microscopy: Illuminates only a thin plane of the sample, reducing overall exposure.
- Structured Illumination Microscopy (SIM): Uses patterned light to minimize unnecessary excitation. Learn more about structured illumination microscopy here.
8. Maintain Proper Sample Preparation
- Use mounting media that support fluorophore stability.
- Avoid environmental stressors like high pH or oxidative agents during sample preparation.
9. Minimize Oxygen Levels
Photobleaching is accelerated by oxygen in the imaging environment. Techniques to reduce oxygen levels include:
- Using oxygen scavengers like glucose oxidase or catalase in the imaging buffer.
- Imaging in sealed chambers with controlled atmospheres.
10. Leverage Hardware and Software Solutions
Modern microscopy systems include hardware and software features to combat photobleaching:
- Hardware: LED illumination systems or low-intensity lasers with rapid on/off cycling. High-sensitivity cameras that can detect lower levels of emitted fluorescence.
- Software: Automated region-of-interest (ROI) tracking to limit exposure to specific areas of the sample.
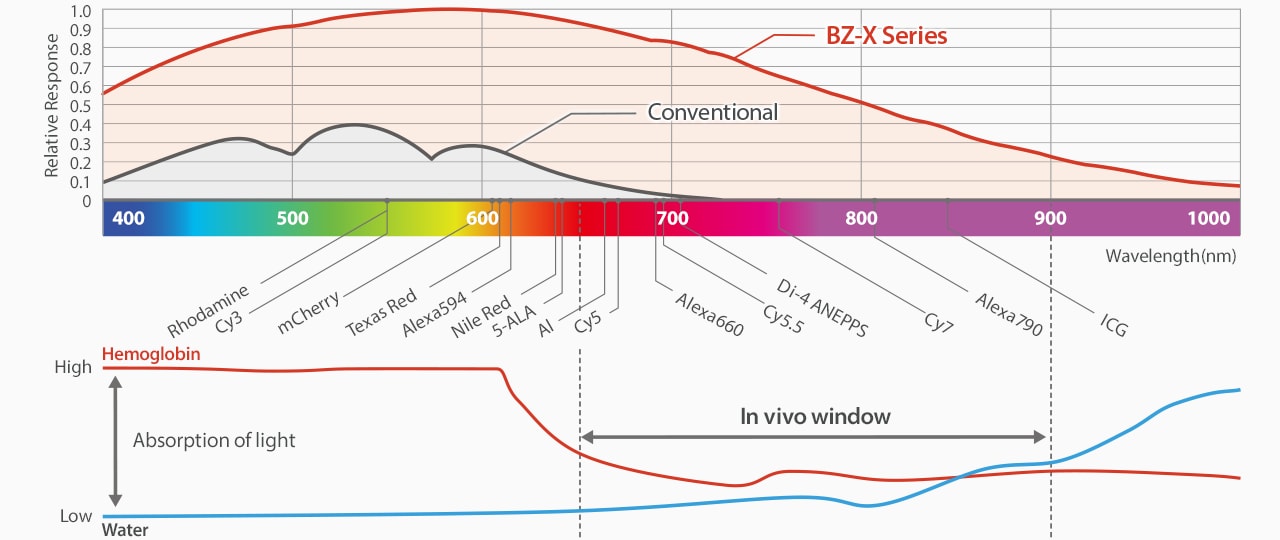
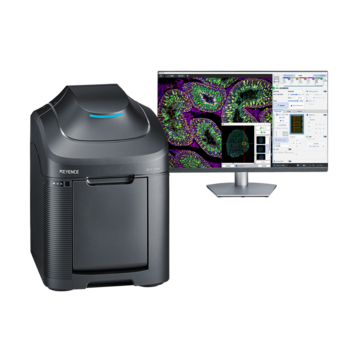
The BZ-X Automated Fluorescence Microscope uses a cooled camera to detect light emissions across a broad wavelength spectrum.
Discover more about this product.
Click here to book your demo.

Choosing the Right Strategy for Your Experiment
For Live-Cell Imaging
- Prioritize low-intensity illumination and brief exposure times.
- Use ROS scavengers or oxygen-reducing buffers to protect delicate samples.
For Fixed Samples
- Invest in high-quality antifade mounting media.
- Select stable fluorophores for multicolor imaging to prevent signal loss in overlapping channels.
For Long-Term Time-Lapse Studies
- Use advanced imaging techniques like multiphoton microscopy or light-sheet imaging.
- Adjust acquisition settings to balance temporal resolution and photostability.
Keeping Photobleaching Under Control in Fluorescence Microscopy
Photobleaching is a manageable issue in fluorescence microscopy if you employ the right strategies. By combining optimized imaging settings, stable fluorophores, and appropriate reagents, you can extend fluorophore lifetimes and achieve consistent, high-quality imaging results. Whether you’re capturing publication-worthy images or monitoring dynamic live-cell processes, minimizing photobleaching ensures your experiments are both reliable and reproducible.
Curious about our pricing?
Click here to find out more.

FAQs
What Is Photobleaching?
Photobleaching is the loss of fluorescence intensity due to the irreversible breakdown of fluorophores under intense light exposure.
Can Photobleaching Be Completely Prevented?
While photobleaching cannot be entirely eliminated, careful experimental design can significantly reduce its impact.
What Are Some Good Antifade Reagents?
Popular choices include ProLong Gold, VECTASHIELD, and DABCO. The best reagent depends on your sample and fluorophore.
The KEYENCE BZ-X Automated Fluorescence Microscope can dramatically reduce the amount of photobleaching that occurs with a sample and extend their lifetime by using several hardware and software technologies. These include:
・A high-sensitivity, cooled monochrome camera to detect even faintly emitted fluorescence signals.
・The ability to control light intensity down to 0.3% of full intensity.
・Synchronized operation using Low Photobleach mode. This function blocks the majority of excitation light from hitting a sample until an adjustment is made (position, focus, etc.).
・Using structured illumination for capturing high-resolution images of thicker tissues or complex structures instead of a laser.
・An integrated darkroom – less exposure to ambient light or time away from fridge.
Schedule an onsite or virtual demo of the BZ-X to see how this microscope can benefit your lab.


