Optical Profilometers

Capturing the features of the target as a surface enables instant measurement of 3D figures over a wide area. This non-contact profile measurement system can measure surface roughness as well as burrs and other microscopic shapes in as little as 1 second. The system automatically determines settings such as the sensitivity according to the target height, size, material, and color. It eliminates measurement mistakes, saves time, and allows inexperienced users to start capturing data immediately.
Product Lineup
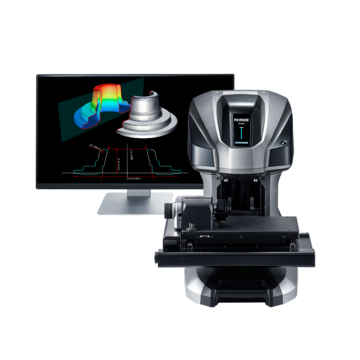
The VR-6000 optical profilometer performs non-contact measurement to replace stylus profilometers and roughness meters. This 3D profile system captures full surface data across the target with a resolution of 0.1 µm, enabling measurement of features that cannot be performed with probe-type instruments. The new rotational scanning greatly expands the measurement capabilities of the system. True-to-life cross section measurements can be performed with no blind spots. Wall thicknesses and recessed features can be measured without cutting or destroying the target. In addition, the HDR scanning algorithm provides enhanced scanning capabilities for instantly determining the optimal settings to capture high quality data, even on glossy and matte surfaces.
Features
Rotational Scanning on a Wide Variety of Materials
A 3D profilometer can be used for a wide range of applications across multiple industries. Examples of materials that can be analyzed using a surface profiler include medical devices, jet engine turbine vanes for the aerospace sector, and valve trains found in automotive manufacturing. Using a 3D surface profilometer in these contexts means you can get accurate measurements of material thickness and detection of defects without the need for the instrument to come into contact with the object. Unlike conventional surface roughness profilometers, parts can be rotated to scan surfaces that would not be accessible otherwise. These qualities and capabilities make these devices ideal for collecting measurements and inspecting precision components such as batteries, circuit boards, and stamped metal parts.
HDR Scanning Algorithm Enables Measurement of More Materials

Automatic Rotation to Perform Measurements with No Blind Spots

Measure Nearly Any Callout with a Single Device
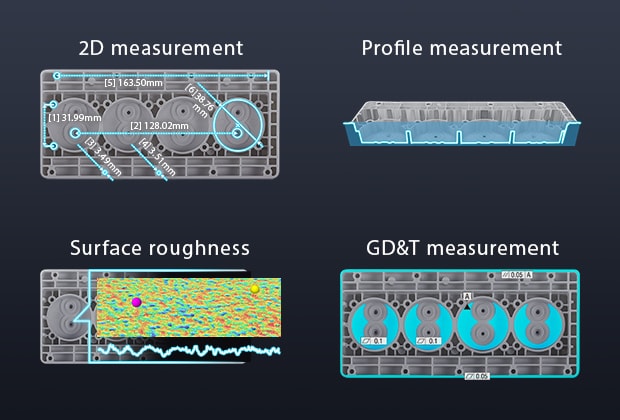
There are numerous measurements that can be taken with a 3D profilometer. For example, this system can be used to record the profile of a target by tracing its surface, enabling measurement of 3D features and surface roughness. It can also capture 2D data to measure lengths, widths, and angles. A 3D profilometer also creates a computer-generated 3D model of the object for visualization of the overall shape, while still maintaining a high resolution to observe minute surface features.
Capture Full Surface Data with 0.1 µm Resolution in Just 1 Second

Consolidate Multiple Measurement Systems Into One Device
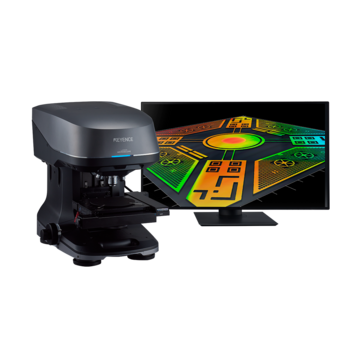
The VK-X3000 3D Surface Profiler uses a triple scan approach, where laser confocal scanning, focus variation, and white light interferometry measurement methods are used, so that high-accuracy measurement and analysis can be performed on any target. The VK-X3000 has a resolution of 0.01 nm and can scan areas up to 50 × 50 mm (1.97″ × 1.97″), allowing for measurement of the overall shape of the target while still maintaining high-resolution for analysis of minute surface features. KEYENCE's new 3D Surface Profiler can handle any target, including those with transparent or mirrored surfaces, large height changes, or steep angles.
Features
Optical Profiler Basics
Observation
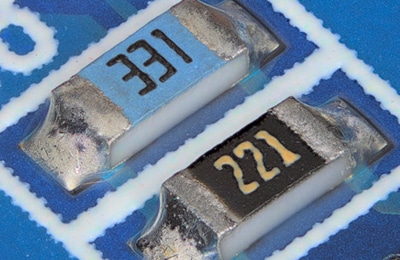
Extensive magnification coverage, ranging from optical microscopes to SEMs
- Magnification up to 28,800×
- Automatic focusing
- Observe any material
Measurement

Instant, non-contact surface scanning
- No target damage
- Accurate nano-level measurement
- Compatible with any shape or material
Analysis

Unprecedented surface characterization
- Quantification of even the most detailed shapes
- Differentiate surfaces easily
- Roughness analysis
Precise Scanning Unaffected By Material and Shape
- Accurately measure steep slopes and angled surfaces
- Best-in-class XY resolution ensures even the smallest features are captured
- No data dropout on transparent or highly-reflective surfaces
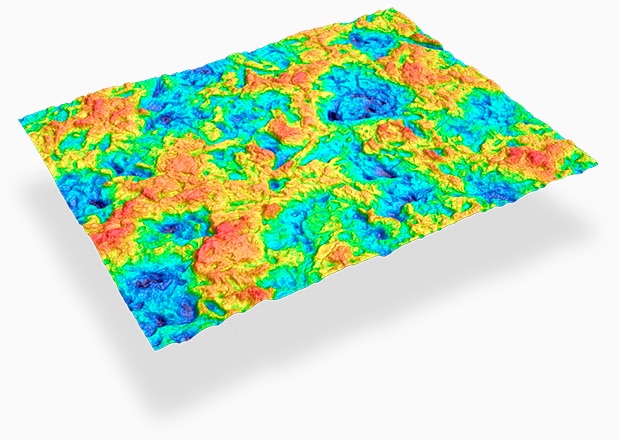
A profilometer captures the three-dimensional profile of a target for measurement. Typical measurements performed with profilometers include surface roughness, flatness, warpage, bend, parallelism, and quantifying height differences.
Profilometers can be divided into contact and non-contact systems. Contact systems physically trace a stylus probe over the target surface in order to capture 2D line data, while non-contact profilometers (also called "optical profilometers") project light onto the target surface and capture 3D surface data.
What is Profilometry?
Profilometry is a highly advanced scientific technique that allows for the precise measurement and analysis of surface topography. It is a field dedicated to capturing detailed information about the shape, texture, and roughness of surfaces, enabling researchers, engineers, and professionals in various industries to make accurate measurements, perform quality control assessments, and gain valuable insights into surface characteristics.
At its core, profilometry involves the use of specialized instruments and techniques to obtain data about the three-dimensional (3D) structure of a surface. By analyzing the surface profile, researchers can uncover crucial information about its geometric features, such as height variations, slopes, curvature, and irregularities.
Profilometry utilizes a range of techniques and instruments to capture data about surface features. While there are many subsets of techniques, they can be broadly categorized into contact profilometry, and non-contact profilometry. Each method has its own advantages and applications, allowing users to choose the most suitable method for their specific needs.
Measurement Principle of Optical Profilometers

Optical Profilometers capture data using a variety of different methods, including white light interferometry, laser confocal microscopy, focus variation, light-sectioning, and many more. With all methods, the measurement instrument is projecting some sort of light onto the surface, and interpreting how that light is returned to the light-receiving method. For example, white light interferometry projects white light onto the surface of the target, and then compares the returned light wave against a known reference wave. Based on the differences between the two waves, the target surface can be reconstructed in 3D.
KEYENCE’s Optical Profilometer uses the light-section method to capture high-resolution 3D data. Structured light is emitted from the transmitter lens and projected onto the surface of the object. The reflected light is then detected by the receiver lens and will appear banded and bent based on changes in the topography of the surface. Triangulation is then used to calculate and measure the height of the surface.
Benefits of Optical Profilometers
Conventionally, contact profilometers were the standard for profile and roughness measurements. However, in recent years, optical profilers are increasingly being adopted by companies to overcome typical limitations of contact profilometers.
Unlike contact profilometers, optical surface profilers project light onto the target surface and are able to capture 3D data across the entire surface. This allows for true 3D measurements to be performed, such as volumetric measurements and area surface roughness.
Since data is captured across the entire surface, it is possible to calculate the highest and lowest points, as well as to measure targets with complex surface features, such as PCBs, both of which are impossible with contact-type measuring systems.
Contact profilometers must physically drag a probe across the surface of a part, which can introduce scratches and dents onto the target surface, potentially rendering the sample unusable. Soft surfaces, such as rubber, cannot be measured because the pressure from the stylus probe will deform the surface.
Optical profilers capture data by projecting light onto the surface, so no sample damage occurs. Additionally, soft surfaces can be accurately measured with no sample deformation.
With contact profilometers, precise fixturing of the target is required in order to capture data. Due to the nature of the device, the stylus must be positioned visually by the operator and can be difficult to determine if the probe is aligned correctly. If the probe is misaligned, the feature of interest could be missed, or incorrect measurement values may be obtained.
3D optical profilers do not require fixturing, as automatic alignment can be performed after capturing the surface data. Since the full surface data is obtained, users can ensure they are measuring in the proper place, and through the use of templates, different operators will obtain the same measurement results.
Types and Features of Profilometers

This type of measuring system touches the target on the stage with a probe to accurately measure the surface profile. The stylus traces the surface of the target, and the vertical displacement of the stylus is detected electronically. Dimensional measurements as well as line roughness can be measured.

This type of measuring system projects light onto the target and uses the reflected light to accurately measure the surface profile. 2D and 3D dimensional measurements are possible, as well as line roughness and surface roughness.
Additionally, optical profilers using white light interferometry are available.
Optical Profilometers Case Studies
Automotive industry
Profilometers measure the Ra (arithmetic mean roughness) and Rz (max. height) of the sliding surface of steering parts. Ra measures the smoothness of sliding surfaces, and Rz measures the surface height. Using Ra alone might cause some points, such as single protrusions, to be overlooked, so it is important that Ra and Rz be used together. This type of analysis enables users to compare changes in surface properties that arise from different metal processing methods. Sa (arithmetic mean height) and Sz (max. height) analysis look at the finishing condition, and Str (aspect ratio of surface properties) analysis checks whether processing traces can be found in external appearances.
The VR Series acquires 3D data of surfaces in as little as one second and is capable of calculating different roughness parameters at the same time. These advantages contribute to a major improvement in measurement efficiency.
Electrical machinery and electronics industry
The Sa (arithmetic mean height) value of the PCB copper foil significantly affects the spread of solder when soldering electronic components. If the Sa value indicates high roughness, the solder will spread over a larger surface area, causing a higher likelihood of leaks. Sdr (developed interfacial area ratio) and Sa of the etching on copper can also be measured to understand the impact soldering and other processes have on the surface.
The VR Series expands roughness capabilities from not just measuring a single line, but across an entire area so the surface conditions can be better understood.
Aerospace industry
Surface roughness and profile measurements on engine components are extremely critical, as any defects or non-conforming products could lead to catastrophic failures. Contact profilometers risk damaging the surface of the part, or if the stylus is not placed in the perfect position defects may be missed.
The VR Series is commonly used to quantify the shape and surface roughness of engine components without damaging the sample. Spc (arithmetic mean peak curvature) is often used to determine the sharpness of the peaks on the surface. Surfaces with sharper peaks are more likely to have small amounts of material break off when they come into contact with another surface, which could cause damage to other components within the engine. The VR Series is capable of performing profile and roughness inspections in as little as 1 second, contributing to enhanced quality control.
Waviness: A Method for Measurement of Waviness and Techniques for Higher Efficiency
Waviness is caused by stress during processing with examples including residual stress caused by punching and drawing during pressing, the temperature and pressure of molten plastic and molds during plastic molding, and the heating of PCBs during the reflow process. The VR Series 3D optical profilometer scans the 3D shape of the target with high accuracy and in a non-contact manner. Differing from conventional contact measuring instruments (which measure shapes using lines or points), it can easily capture the shape of the entire target in as little as one second. Additionally, uneven surfaces can be visualized with color maps, the profile of the specified cross section can be measured, and multiple measured results can be lined up to analyze their waviness as a batch.
Warpage: A Method for Measurement of Warpage and Techniques for Higher Efficiency
In general, warpage refers to the curvature of plate materials, indicating the measurement and evaluation of whether the flatness exceeds the specified tolerance values. However, it is difficult to accurately capture the warpage of an entire target with a profile measurement system that measures with lines or with a coordinate measuring machine that measures with multiple points. With the VR Series 3D Optical Profilometer, you only need to place the target on the stage and scan it. The 3D shape of the entire target can be captured in as little as one second with no positioning required. Warpage caused by mechanical stress during drawing and warping of surface mounted PCBs can be visualized with color maps, allowing for easy batch analysis and comparison of the flatness of multiple targets.
Curved Shapes: A Method for Accurately and Easily Measuring Fillets and Rounds
Measurements of the curved shapes of fillets and rounds using conventional measuring instruments such as coordinate measuring machines, profile measurement systems, radius gauges, CR calipers, CR measuring gauges, and radius measuring instruments are difficult, resulting in variation in the measured values. The VR Series 3D Optical Profilometer can measure the 3D shape of the target with high accuracy by performing non-contact, high-speed scans. Even targets where the pitch is small and there are recesses, such as blade tools and heatsink fins, can be measured easily. Furthermore, the wide variety of assist tools enables quantitative evaluation by allowing perpendicular profile lines to be drawn easily and accurately.
Flatness: A Method for Highly Accurate and Instantaneous Measurement of Surface Flatness
Flatness is the degree of unevenness, warpage, waviness, and strain of a surface. Measuring flatness with a coordinate measuring machine takes a long time because multiple points must be touched with a probe. It is also difficult to discern and quantitatively evaluate the overall shape of the target. However, the VR Series 3D optical profilometer scans an entire surface in as little as one second, allowing for highly accurate measurements. With no need for leveling and positioning, the wide variety of assist tools can be used to easily complete the setup required for flatness and parallelism measurements.
Parallelism: A Method of Easily Measuring the Parallelism of Press Formed Products
Springback is caused by the internal stress inside the formed product after pressing and affects the parallelism. To guarantee dimensional accuracy, it is necessary to measure the parallelism. However, it takes a long time to measure and calculate multiple points with a coordinate measuring machine. An additional problem with CMMs is that measured values vary between operators. With the VR Series 3D optical profilometer, which scans an entire surface in as little as one second and measure with high accuracy, assist tools can be used to easily set and measure parallelism, perpendicularity, and other items that require datums, enabling comparisons of the captured data with 3D-CAD data and other products.
Wear Evaluation: A Method of Measuring Wear and Problems of Bearings
Typical bearing defects include wear, flaking, galling, and peeling. Accurate 3D shape measurement can be used to check for these defects on bearing parts. The VR Series 3D optical profilometer solves the issue of long measurement times and quantifying the overall shape that happens with conventional profile measurement systems and coordinate measuring machines. The VR Series eliminates the need for positioning and allows the operator to measure the target just by placing it on the stage and pressing a button. The high-speed scanning enables highly accurate, non-contact measurements of the entire target's surface. Even difficult measurements, such as wear measurement of balls, rollers, and raceway surfaces, are completed in as little as one second.
We're dedicated to bringing value to our customers through advanced technology and exceptional service in everything we do. This commitment has enabled us to become the leading supplier of sensors, measuring systems, laser markers, microscopes, and machine vision systems used in manufacturing operations around the world. To learn more about this equipment or anything else we have to offer, get in touch with us today.
Frequently Asked Questions About Profilometers
Contact profilometers are limited to capturing line data across the target surface. Because of this, the surface profile cannot be measured across the entire surface and minute surface details may not be captured.
The VR Series can scan the entire surface of the target. Surface measurements are performed over a 200 × 100 × 50 mm (7.87" × 3.94" × 1.97") area, which makes it possible to accurately visualize the surface warpage using a color-coded display. Surface maximum and minimum points can be measured, and small surface irregularities can be identified and analyzed.
Ra measures the mean height of a line of data captured on the target surface, and is commonly used to express the overall "roughness" of the surface. Sa is an extension of Ra; instead of measuring the mean height of the surface across a single line of data, Sa measures the mean height of the surface across an entire area. In recent years, many industries have transitioned to using Sa for its increased accuracy and ability to identify non-conforming products.
Profilometers are commonly used for measuring the roughness, or finish of a surface. Additionally, optical profilometers are capable of taking 3D shape measurements, such as flatness, waviness, warpage, radii, step heights, etc.

This guide introduces two points to consider before adopting profilometers or roughness gauges. It explains the problems encountered when using conventional measurement systems and how to work around them. Recommended for potential users considering profilometers and roughness gauges.
Measure large and small targets with our 3D measurement systems. Micron-order roughness and profile data as well as warpage analysis are possible. This guide covers the functions useful for measuring large components.
The VR Series offers non-contact, high-speed, high-accuracy surface measurements. This guide details where it is used and why the series is a preferred choice for our customers. Download the document and discover for yourself the benefits the VR Series offers to your industry.

This guide is a collection of cases where the VR Series provided solutions to problems that were unsolvable by conventional measuring instruments, such as dealing with warpage, deformation, dents, burrs, and viscous targets. A must-read for measurement operators.

