Introduction to Dilution Techniques for Microbial Enumeration
Sample dilution serves many important purposes in microbiology, from quantifying microorganisms present to the managing of sample volume. Let’s review the purpose of dilution in more detail along with some of the most common dilution techniques.
Key Reasons to Dilute a Sample
- Quantification of Microorganisms
-
One of the primary purposes of dilution in microbiology is to accurately quantify the number of microorganisms present in a sample through colony counting. Microbial samples often contain a wide range of concentrations, from very high to very low.
Direct enumeration of microorganisms from undiluted samples can lead to overcrowded agar plates (in spread plate or pour plate methods) or indistinguishable colonies (in drop plate method) which can make colony counting difficult or impossible, especially when doing manual colony counting. By diluting the sample, microbiologists can reduce the concentration of microorganisms to a level where individual colonies can be counted accurately on agar plates or membranes. - Isolation of Pure Cultures
- Dilution is crucial for the isolation of pure cultures of microorganisms from mixed populations. When working with complex samples that contain multiple types of microorganisms, dilution helps to separate individual colonies on agar plates. This isolation is essential for studying the characteristics, physiology, and biochemical properties of specific microorganisms without interference from other types.
- Facilitating Further Analysis
- Dilution also facilitates various types of microbiological analyses and tests. Diluted samples are often easier to handle and process in experiments such as antibiotic susceptibility testing, biochemical assays, and molecular biology techniques. Dilution ensures that the concentrations of microorganisms are within the linear range of detection for assays and instruments used in these analyses.
- Managing Sample Volume
- In many cases, the volume of samples available for analysis are limited, particularly in environmental and clinical microbiology. Dilution allows microbiologists to extend the use of a sample across multiple tests or replicates without compromising the accuracy of the results. By diluting the sample appropriately, researchers can maximize the information obtained from limited resources.
Contact us to learn more about how our advanced technology can help take your business to the next level.
Contact Us
How to Dilute a Sample
The primary method for diluting a sample is called serial dilution. This is when sequential dilutions are made from an original sample to achieve a range of concentrations that are suitable for colony counting and other analyses. In this method, a small volume of the sample is added to a larger volume of diluent, and then the process is repeated through a series of dilution tubes or plates to achieve the desired ratio. This is the primary method used for dilution and has two common techniques for implementing it.
Decimal Dilution (Log Dilution)
In this method, dilutions are made in factors of 10 (1:10, 1:100, and so on – hence the name, log dilution), in order to reduce the concentration of microorganisms for accurate colony counting or analysis. Each dilution step should reduce the concentration by a factor of 10.
Fractional Dilution
This method is very similar to what’s done in decimal dilution; however, the dilution factor is done in fractional increments, such as 1:5 or 1:20, and not in increments of 10. Fractional dilution is used when a specific dilution factor is required based on the expected concentration of microorganisms.

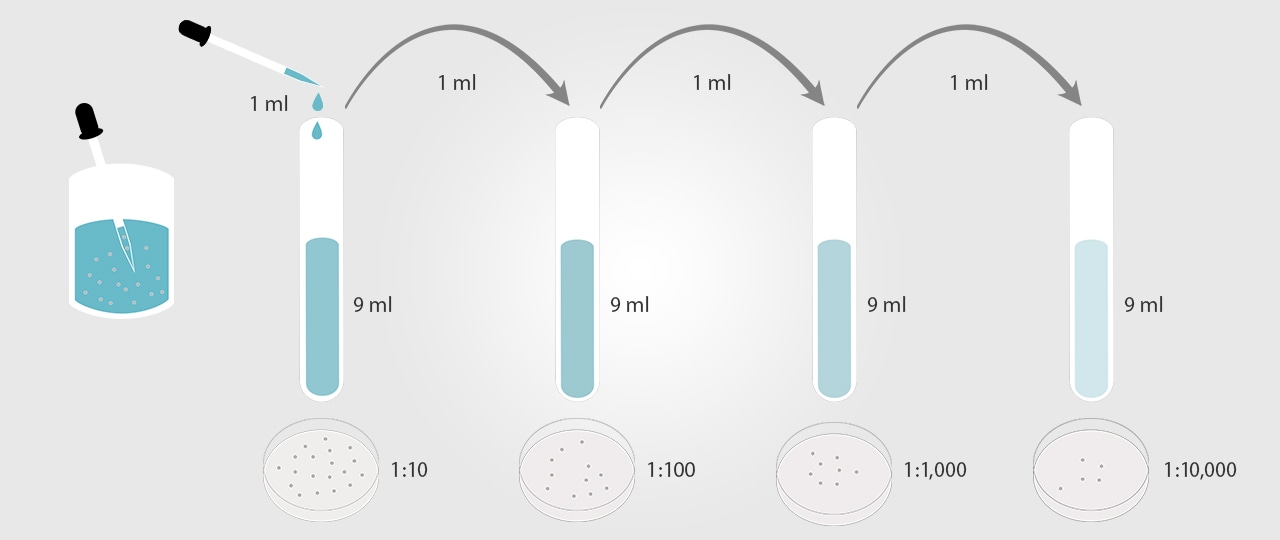
Example of serial dilution by factors of 10
We’re here to provide you with more details.
Reach out today!

Steps Involved in Serial Dilution
-
1.
Preparation:
Gather the necessary materials: the concentrated sample, sterile diluent, sterile pipettes or micropipettes, and a series of sterile tubes or dilution blanks. -
2.
Initial Dilution:
Add a known volume of the concentrated sample (e.g., 1 mL) to a known volume of diluent (e.g., 9 mL) to create the first dilution. Mix thoroughly. -
3.
Subsequent Dilutions:
Take a fixed volume from the first dilution and add it to a fresh tube of diluent. Repeat this process for the required number of dilutions. Each step should reduce the concentration by the same factor. -
4.
Plating and Incubation:
Spread aliquots from each dilution onto agar plates or another media using a sterile spreader or pipette. Incubate the plates/media under appropriate conditions for the microoganisms being studied. -
5.
Colony Counting and Calculation:
After incubation, count the colonies on plates or other media with a manageable number of colonies (typically 30-300). Calculate the concentraion of microoganisms in the original sample using the dilution factor and the counted colonies. You can count the colonies manually or with an automated colony counter, like the BC-1000 Series.
Discover more about this product.
Click here to book your demo.

Example of Serial Dilution
To illustrate serial dilution, let's start with a bacterial culture at an unknown concentration and perform a tenfold serial dilution as follows:
-
1.
First Dilution (1:10):
Add 1 mL of the bacterial culture to 9 mL of sterile water. This is a 1:10 dilution. -
2.
Second Dilution (1:100):
Take 1 mL from the first dilution and add it to another 9 mL of sterile water. This is a 1:100 dilution. -
3.
Third Dilution (1:1,000):
Take 1 mL from the second dilution and add it to 9 mL of sterile water. This is a 1:1,000 dilution.
This process can continue as needed, depending on the required concentration.
Curious about our pricing?
Click here to find out more.

Tips for Effective Serial Dilution
- Sterility
- Ensure all materials and solutions are sterile to prevent contamination.
- Accuracy
- Use calibrated pipettes or micropipettes for precise measurements.
- Mixing
- Mix each dilution thoroughly to ensure even distribution of microorganisms.
- Replication
- Perform serial dilutions in triplicate to account for variability and improve accuracy.
The end result of a successful serial dilution is that you should be able to identify and count the number of colonies present in a sample. Therefore, having an appropriate system for counting colonies is essential for accurate enumeration, reducing consumable costs, saving time in sample prepartion, and improving early detection.
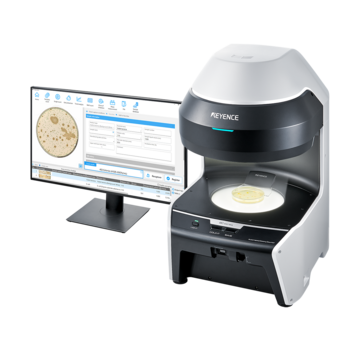
Our BC-1000 Series Automated Colony Counter features a high-resolution camera that can detect colonies down to 50 microns, which means that you can find colonies earlier in the incubation process. Additionally, this system can count any number of colonies present on a sample, so you don’t need to dilute your original sample as many times to reduce the concentration. Fewer dilution steps help save you time and money and limit the possibility that errors will occur.
We’re here to provide you with more details.
Reach out today!

Takeaways
Dilution plays a critical role in microbiology by enabling accurate quantification, isolation of pure cultures, facilitating further analysis, and managing sample volumes effectively. It is a fundamental technique that underpins many microbiological experiments and analyses, ensuring reliable and meaningful results in research, clinical diagnostics, food safety, environmental monitoring, and various other fields of study.
Regardless of the volume of microorganisms present in your sample, you need a reliable method to quickly and accurately count colonies. The earlier in the process you can count colonies means the fewer the resources that will be used and the more quickly you can conduct your analysis.
With the BC-1000 Series Automated Colony Counter from KEYENCE, any user, regardless of skill, can count colonies on plates, dishes, or pads and get traceable data in just one second. Download the product catalog to learn more.
Contact us to learn more about how our advanced technology can help take your business to the next level.
Contact Us


