Optical Micrometer / Laser Micrometer

Similar to laser micrometers, optical micrometers are thrubeam sensors that measure any object that blocks the light passing from the transmitter to the receiver. These sensors are designed without moving parts to provide accurate measurements without regular maintenance. KEYENCE’s optical micrometers come in single-axis, multi-axis, or 2D models, which create 2D backlit images. Micrometers are ideal for measuring diameter, gaps, width and much more with high accuracy.
Recommended Items
Product Lineup

TM-X5000 Series telecentric measurement systems provide fast and accurate measurements by capturing the silhouette of a target. The dual telecentric optical systems provide reliable results inline by delivering focused images over a large depth of field. This design, in combination with the low-distortion lenses and proprietary algorithms, enables accurate measurements anywhere in the field of view, eliminating the need for precise target placement, external lighting, or even on-site calibration. The user-friendly system can be configured in 3 simple steps and includes over 100 tools for measurement and inspection, including GD&T, master comparison, and defect distance detection.
Features
Large ø 120 mm ø 4.72" Field of View Model Now Available
There are 4 models that can be selected based on the requirements of the application from the compact and ultra-high precision model with a diameter of 6 mm to the ultra-wide field of view model with a diameter of 120 mm 4.72".

Accurate Even with Misaligned Targets

The dual telecentric optical system—with telecentric lenses in the transmitter and receiver—ensures sharp edges without sacrificing accuracy even for misaligned targets.
This technology enables stable measurement in a large depth of field (+/- 20 mm +/- 0.79"), providing a robust solution for inline measurement.


LS-9000 Series high-speed optical micrometers are highly durable and provide a high sampling speed (16000 samples/second) and repeatability (±0.03 μm) required to perform reliable inline measurements. Thanks to their specialized optical design using high-intensity LED and telecentric lenses, these sensors do not contain any moving parts, thus delivering accuracy over a long service life. Its high speed, accuracy, and durability allow for stable inline and offline measurement in a variety of environments regardless of target material. The high-speed exposure captures clear images of moving targets, enabling accurate measurements for wires and other targets prone to vibration. The system can calculate a target's angle and automatically eliminate errors due to tilt or misalignment. With its IP67 environmentally resistant design and air purge unit, this product is resistant to dirt and temperature changes and can be used in a variety of locations and environments.
Features
![]()
Accurate Measurement Even on Vibrating Targets
Thanks to the class-leading 16kHz sampling speed, images can be captured accurately and without blurring, even on vibrating targets, ensuring accurate measurements.
![]()
Stable Measurement Even on Tilted Targets
The built-in monitor CMOS sensor recognizes target tilting and automatically corrects measured values according to the detected angle, allowing for accurate measurement.
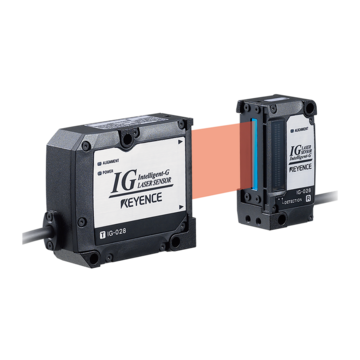
IG Series multi-purpose CCD laser micrometers provide high-precision differentiation that is unaffected by how much light the target transmits. This series uses a line-charge coupled device (L-CCD) as its light-receiving element. Instead of using received light intensity, it captures the edge of transmitted laser light, so it can perform high-accuracy, stable differentiation with 5 μm repeatability and ±0.1% linearity. This makes the IG Series capable of supporting various applications, including edge detection and positioning of clear glass, precise recognition of workpiece OD, feedback control while detecting a sheet edge, and roll gap measurement. The positioning monitor on the main unit facilitates optical-axis alignment when starting up a line and during changeovers.
Features

Easy To Use
The position monitor makes it easier to align the optical axis. Easily perform optical axis alignment by adjusting the sensor head so that all of the position monitor lights turn red.

Environmental Resistance
The enclosure satisfies the IP67 rating based on the IEC standards and remains watertight even after being held at a depth of one meter for 30 minutes. The enclosure is resistant to adverse environments and offers long-term durability.

TM-3000 Series high-speed 2D optical micrometers were the first in the world to enable calibrated backlit measurement. They can be used both inline and offline to simultaneously complete measurements in the X- and Y-axis, such as outer diameters and height differences. The high-intensity LED and dual telecentric optical system provide highly repeatable results that are unaffected by external lighting. Maximum outer diameters, angles, etc., can be measured instantly because areas, not points, are measured. The part's position is detected, and measurements are automatically adjusted to the proper location, enabling accurate measurements. The system is capable of 15 types of basic measurement modes and 8 types of auxiliary measurement modes, providing a robust solution for a wide variety of applications.

LS-7000 Series high-speed, high-accuracy digital micrometers use our proprietary optical system with no moving parts to provide a measurement solution with high speed, accuracy, and durability. Conventional laser scanning micrometers drive a polygon mirror with a motor to measure parts. In contrast, the optical system of the LS-7000 Series uses a high-intensity GaN green LED light source, telecentric lenses, and an HL-CCD to deliver high performance over the lifespan of the sensor without constant maintenance or recalibration. Additionally, the system is equipped with a built-in monitor CMOS that displays the target within the measurement range, making it easy to check the measurement location or adjust the position of the target as necessary.
Features
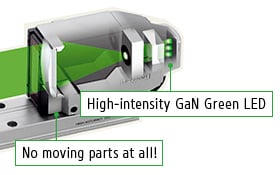
Designed without Moving Parts for Longer Lifespan and Less Maintenance
KEYENCE’s proprietary optical design has no moving parts, eliminating the need for recalibration and long term maintenance.

Achieve High-Accuracy Measurement in-Line
Increased sampling speed makes high-accuracy measurement possible on moving targets, as well as still targets.
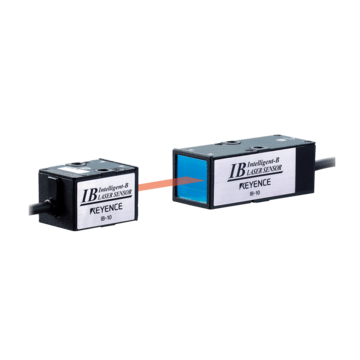
IB Series thrubeam-type laser detection sensors cater to a diverse range of applications by differentiating received light intensity with high accuracy. This series uses a photodiode (PD) for its light-receiving element. By accurately detecting the changes in received light intensity, it can support various applications without being affected by the target. For example, the IB Series can be used for applications that are impossible with photoelectric sensors, such as the detection of liquid crystal glass and liquid turbidity, differentiation of film types, tilt detection of chips, and incorrect seating of caps, all at low cost. The compact sensor head is equipped with an alignment LED, so optical-axis alignment is easy.
Discontinued Series
A laser micrometer is a non-contact measurement tool that detects physical dimensions by capturing how an object interrupts a light beam.
Unlike older tools, the laser micrometer doesn't rely on physical contact. Instead, a transmitter emits a laser or LED beam across a defined space to a receiver, and when a part passes through the beam, it casts a shadow. The system can then calculate precise values like diameter, edge position, or spacing based on how long or far the beam is blocked.
Benefits of Optical Micrometers
High-speed telecentric measurement systems enable dimensional measurements at multiple locations by instantly capturing projected images of moving targets without having to stop the line, greatly reducing the inspection processing time.
The high-intensity green LED light source, telecentric optical system, and high-sensitivity CMOS allow the TM-X5000 Series to measure dimensions accurately from sharp-edged silhouettes captured without having to stop fast-moving targets. The diverse measurement tools can be combined to support multiple measurement points and varied inspection items. 100% inspection is possible with no negative effect on the processing time, which is not possible with offline-only dimensional measurement systems such as conventional optical comparators.
Traditionally, when using a telecentric measurement system in an inline manner, projected images would be blurred or out of focus due to the misalignment of moving targets. A large depth of field eliminates this concern, allowing these systems to measure stably by capturing sharp images of edges with no need for major adjustments to the position of the target.
The telecentric optics used in both the transmitter and receiver allow TM-X5000 Series telecentric measurement systems to capture true-to-life images of edges. Images are captured with consistent accuracy and a maximum depth of field of ±15 mm (0.59"), even when the target is misaligned. Low-distortion lenses and our proprietary algorithm eliminate the need for target position adjustment and calibration of factors such as lighting. Consequently, measurement errors caused by misalignment and the subsequent decrease in yield rate can be eliminated before they occur.
With an outer diameter measurement system, it is possible to continuously perform inline dimensional measurements of line-, rod-, and web-shaped targets such as wires, extrusion-molded products, and sheets. The constant exposure yields uninterrupted measurement, ensuring that no inspections or defects are missed.
Outer diameter measurement systems can be measured continuously. Stable measurement is a necessity when attempting to eliminate missed inspections and missed defects. With a thrubeam optical micrometer using a laser scanning system, missed inspections may occur for microscopic targets because changes cannot be detected when away from the scan line path. To eliminate this problem, LS-9000 Series and LS-7000 Series high-speed, high-accuracy digital micrometers are equipped with a high-intensity green LED light source and measure across the entire field of view within the exposure time. This ensures that no temporary value changes or inspections are missed and allows for precise measurement.
1D Optical Micrometer
Green LED light is emitted as a uniform collimated beam. When a target breaks this beam a shadow is formed on the light receiving element, measuring this shadow gives us an accurate representation of the target.

(A) Monitor CMOS
The Monitor CMOS tracks workpiece inclination to automatically correct for tilt errors.
(B) High-speed exposure CMOS
Proprietary designed measurement CMOS features an integrated amplifier to maximize performance and speed.
(C) Target position CMOS
The CMOS measures the position between the transmitter and receiver.
(D) High-intensity green LED
High-intensity green LED lasts longer than traditional LED light sources while providing high intensity and evenly-distributed lighting.
(E) High performance condenser
Lens unit efficiently focuses LED light.
Laser Scan Micrometer
A laser is emitted onto a spinning polygon mirror which traverses the beam throughout the sensors measurement range at a constant speed. Measurements such as the outer diameter are determined by measuring the amount of time the light is blocked from the receiver.
Principle diagram of laser scanning method

Dual Telecentric Silhouette-Based System
The transmitter emits collimated lighting with a green LED to project a shadow on the CMOS sensor in the receiver.
Measurement is then performed using this captured image. The TM-X5000 Series includes telecentric lenses in both the transmitter and the receiver, ensuring stable, high-accuracy measurement.

(A) Telecentric lens in transmitter
(B) High-brightness InGaN green LED
(C) Telecentric lens in receiver
(D) High-sensitivity, high-resolution CMOS
How Do Optical Micrometers Work?
Like their contact-measurement counterparts, optical micrometers measure small distances with very high precision. However, optical micrometers (such as KEYENCE’s LS9000 and TM-X5000 Series) take non-contact dimensional measurements using light.
The exact type of light typically depends on the model and type of laser micrometer. Most systems typically consist of an emitter (such as an LED) which emits a light beam or a scan line across a gap to a photosensitive receiver.
When an object is placed into the beam’s path, it interrupts the light (or some of it) and creates a shadow. Optical micrometers analyze this shadow and derive the object’s size with incredible precision.
This non-contact approach to measuring small distances allows optical micrometers to measure delicate, fragile, and soft materials without causing any damage or deformation to the workpiece. Furthermore, the operation principle also allows laser micrometers to provide fast measurements with high accuracy.
Optical micrometers capture the silhouette of targets as they pass between a transmitter and receiver. Unlike a conventional laser micrometer, optical micrometers employ a high-intensity LED, telecentric lenses, and a high-speed CMOS to capture images of the full field of view simultaneously. This eliminates the need for moving parts or recalibration to maintain high accuracy. Optical micrometers come in single/multi-axis units for 1D measurements such as diameter or edge position, or 2D units, like the telecentric measurement system, for a more flexible solution.
What Industries Use Optical Micrometers?
Semiconductor/Electronics
In semiconductor and electronics production, laser micrometers monitor wafer thickness and circuit spacing while components move through inspection. As these systems support inline measurement, they help manufacturers avoid delays while maintaining tight tolerances.
Automotive
Automotive manufacturers rely on optical micrometers to check shafts, pistons, and valve dimensions as parts move through machining or assembly. Measurements are captured without contact, preventing surface wear and allowing for consistent results.
Aircraft
Precision is paramount to the aerospace industry, so laser micrometers are extensively used in the production of aircraft parts and components. They ensure that parts are manufactured within strict dimensional tolerances and fit together as intended by the designer.
Medical
The production of medical equipment requires strict adherence to dimensional specifications and a whole range of safety standards, underscoring the importance of non-contact measurement as a means of avoiding equipment contamination. Optical micrometers measure small and precise components used in medical implants and instruments.
Engineering and manufacturing
Precision engineering and manufacturing requires the fabrication of parts with incredibly tight tolerances. This industry uses optical micrometers and non-contact micrometry for a wide range of different applications, from specialized machinery to electronics… and even musical instrument crafting.
Materials science
Lastly, laser micrometers are often used in material science, research, and development to study material properties and behavior. Their accuracy and precision allow laser micrometers to measure the slightest changes in dimensions that might occur under different conditions. This greatly aids the study of material expansion, contraction, and deformation.
Optical Micrometer Case Studies
Profile inspection of the tungsten electrode tip of a TIG welding robot
Continuously operating a welding robot for a long time deforms the profile of the electrode tip (its angle or bend), leading to welding failure. Install a TM-X5000 Series telecentric measurement system in the booth of the welding robot. Considering the load applied to the electrode tip, add a motion for passing this tip through the transmitted light of the TM-X5000 Series once every 50 continuous welding actions. Even if the target is moving, the TM-X5000 Series can measure profiles with non-blurry images, so it can accurately capture changes in the electrode profile, preventing welding failures while minimizing the effect on processing time. In addition to welding machines, there are also applications to profile inspections of the tools of various robots and automatic machines.
Outer diameter measurement of injectors at multiple points
An injector is assembled from multiple parts, so inspections require outer diameter measurement at multiple points. Normal outer diameter measurement systems have high installation costs and increase the inspection processing time because it is necessary to install multiple units or to move the measuring system to measure all the points. Also, to guarantee the accuracy of the measurement system, the moving mechanisms must be maintained, which takes time and effort. A telecentric measurement system can measure the outer diameters of multiple points within the field of view in an instant and can also simultaneously inspect multiple items, such as coaxiality.
Positioning of glass substrates (transparent targets)
The alignment of glass substrates requires high accuracy and conventionally has been done only through the use of vision systems. However, positioning of transparent targets is difficult and can require complicated pre-alignment and calibration to improve processing times while maintaining high accuracy. LS-9000 Series high-speed optical micrometers provide a mode for measuring transparent targets in addition to a two-level edge detection threshold value setting, enabling stable measurement and positioning with simple applications even when handling edge profiles on a thin glass substrate.
Laser micrometers maintain accuracy by controlling how light is directed and detected. Dual telecentric lenses keep the beam uniform and help produce consistent shadows across the entire measurement range. High-speed exposure and intelligent edge detection eliminate measurement drift, even if a part is vibrating or misaligned. The system is able to capture the whole field of view, meaning it doesn’t have to rely on scan points or repeated passes. By reducing the sources of variation, laser micrometers deliver stable results for every measurement.
Compared to traditional tools, laser micrometers provide consistent results without needing a skilled operator. A digital micrometer may still need contact and calibration, while optical systems perform continuous measurements without touching the part.
Traditional micrometer types are better suited for bench testing or single-item checks. Laser micrometers work best when speed, repeatability, and hands-off operation are required, and this is especially true in automated environments where contact tools may fall short.
Selecting the proper optical micrometer depends on your application's requirements; it is also important to consider your tolerance thresholds, material types, and how fast your process runs. A single-axis model works well for basic diameter checks. Multi-axis systems are better for roundness, concentricity, or complex profiles.
The right laser measuring device should handle your parts accurately and work seamlessly with your existing setup. KEYENCE offers options tailored to specific part geometries so you can integrate the system without slowing down production. Contact us today!
The Measurement Library is a website that provides thorough explanations of measurement basics, measurement system selection, application solutions, the types and principles of measurement with laser displacement sensors, and case studies where problems are solved through the installation of such sensors.

The Selecting a Measurement Sensor site introduces proven solutions in various industries, including automotive, film & sheet, and electric & electronic components- for laser profilers, as well as our other laser displacement sensors and measurement systems. Applications can also be explored by measurement types, such as thickness, width, height, height difference, and 3D inspections.
Frequently Asked Questions About Optical Micrometers
With an exposure time of just 100 μs (0.1 ms), the TM-X5000 Series telecentric measurement systems can simultaneously measure up to 100 items in a single shot by quickly capturing in-focus 2D projected images with no need to stop fast lines. A diverse selection of over 100 tools is available. These tools can be combined for batch measurement of the outer diameter, width, height, and radius of complicated profiles and of—for example—the pitch, height, angle, etc. of multiple screw threads from projected images captured inline.
The TM-X5000 Series telecentric measurement systems provide intuitive operation for setting the desired measurement items: just select icons to combine the basic tools, element tools, auxiliary tools, application tools, and GD&T tools. Among the GD&T tools, the following can be selected and combined with other tools for inline inspections of various drawing instructions:
- Form tolerance: Straightness and circularity
- Orientation tolerance: Perpendicularity and parallelism
- Location tolerance: Concentricity
A wide range of measurements required for inline inspections are supported, including master comparisons for identifying products and foreign particle distance measurements for appearance inspections.
The LS-9000 Series high-speed optical micrometers are standard-equipped with an air purge unit for an environmentally resistant design that meets the IP67 standard. Highly resistant to steam, dust, contamination from substances like oil, mist, impacts, and temperature changes, this product provides stable outer diameter measurements even in harsh environments. Once it is installed in a variety of processes, it can measure continuously with constant exposure, allowing for real-time identification and prompt handling of errors. Because measurements can be performed during processes, large numbers of defects are no longer detected in post-processing inspections, improving the yield rate in various environments.
Optical and laser micrometers are renowned for their high precision; the LS-9000 Series detects objects as small as 0.08 mm or 80 µm with an accuracy of ±2 µm. In most cases, top-tier optical and laser micrometers often achieve accuracy in the micron range, often between 0.1 µm and 10 µm. This degree of accuracy makes optical and laser micrometers very valuable to industries that demand exact measurements, such as semiconductor manufacturing and precision engineering.
Though both systems are used for precision measurement, they’re fundamentally different in their operational principles and applications. Optical micrometers use a laser light source to measure a particular object. The light is directed at the measured object, which projects the object’s shadow or silhouette onto a light receiver; the size of the shadow is what provides the measurement. As such, optical and laser micrometers provide speedy and highly accurate measurements.
On the other hand, backlit vision systems rely on a backlight, which is used to illuminate the object, creating a sharp silhouette. But instead of a receiver that would collect the data and send it to processing, the silhouette in backlit vision systems is captured by a camera, and its software processes the image to measure an object. These systems are, admittedly, great for measuring complex 2D measurements or quality control, but they’re considerably slower and less accurate compared to optical micrometers.
Both types of devices belong to the laser measurement product line-up, but they have their distinct advantages. Laser micrometers are typically faster, as they measure the entirety of the object’s profile in a single pass or shot. This makes them great for in-line processes in which speed is of the essence. Laser Scan Micrometers, on the other hand, rely on a moving laser beam that moves and scans across an object. There’s an advantage here, as Laser Scans are capable of providing exceptionally detailed profile measurements, especially when scanning complex geometries and intricate surfaces. However, they’re also considerably slower compared to in-line laser micrometers, and require upkeep and maintenance due to the moving components.
Optical micrometers are exceptionally versatile and capable of measuring a wide variety of objects. This includes cylindrical objects, such as wires, rods, and tubes, but also transparent and opaque objects, such as glass or metal sheets. You can also measure components in electronics, semiconductor materials, fiber optics, and any material where a non-contact measurement methodology is preferred or even necessary to prevent workpiece damage or contamination. However, while the list of materials optical micrometers can measure is lengthy, you still have to ensure that the object’s size is within the measurement range of the micrometer.
The TM Series made its name as the world’s first optical comparator usable in an inline manner. This booklet explains this product’s proprietary mechanisms and advantages while comparing it against conventional outer diameter and dimensional measurement methods. It is highly useful in understanding KEYENCE’s telecentric measurement systems.

Telecentric measurement systems and thrubeam optical micrometers—which can continuously measure the total length of targets—see heavy use at worksites where cables, fibers, and other long targets are handled. If you work with targets like this, you won’t want to miss the detailed usage examples in this booklet.
The LS-9000 Series does so much more than just solving conventional outer diameter measurement problems. See this booklet for the advantages of the high-intensity green LED light source and introductions of useful functions not available in the catalog or online.


